How to get the best out of your Yubikey with GPG
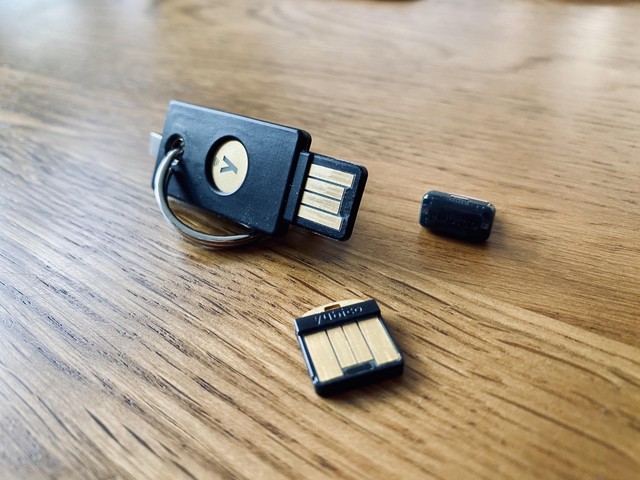
I’ve been using a set of Yubikeys for some time now, not just for 2FA but for SSH authentication, remote code signing and password storage too. It’s worked so well (and required such significant effort to get working) that I thought I’d write about how I did it and what makes my approach secure.
GPG, or GnuPG – now in version 2.x implements the OpenPGP email encryption standard and allows the use of hardware smartcards such as the Yubikey 5.
This guide is applicable to most Linux distributions and MacOS. I’m currently using Ubuntu 20.04 and MacOS Mojave.

Initialisation
To start, you’ll need to install ykman and gnupg together with the right interface software; pcscd and scdaemon on Ubuntu.
In order to use your Yubikey for everything in this article, it has to contain the only copy of your GPG private keys; GPG must have the public parts and be configured to use the Yubikey as an OpenPGP smartcard.
With OpenPGP/gnupg there are many different possible key topologies and crypto settings. What you want will depend on what you need the configuration for.
OpenPGP setup
I recommend you follow this setup process in livecd session in order to mitigate the risk of the private keys being intercepted by a bad actor before they are copied to the yubikey.1
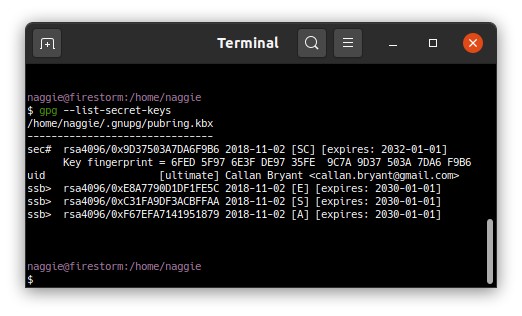
GnuPG2 classifies keys by their capability; you’ll notice (some of) the characters [CSEA] alongside listed secret keys with GnuPG2. Whilst fundamentally the private keys are just a number of bits, GnuPG2 can earmark each key with one or more capabilities upon generation such that it can only ever be used for the allocated purpose thereafter. The key capabilities are: [C]ertificaiton, [S]igning, [E]ncryption and [A]uthentication.
As I understand, it is simply good cryptographic practice to have single-purpose keys; you should not, for instance, use the same key to authenticate as you should to encrypt. The reasoning behind this is presumably to mitigate some kind of theoretical attack.
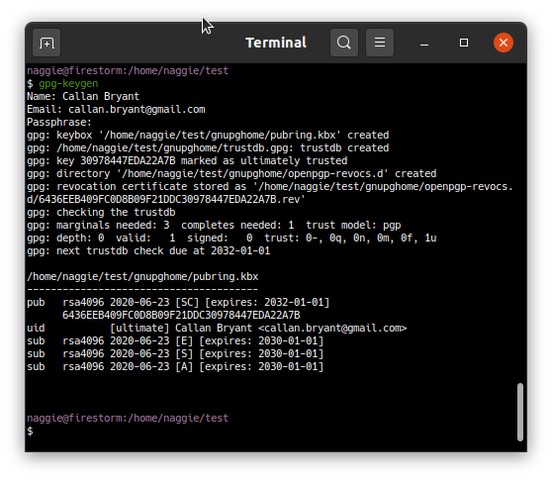
GnuPG2 historically has in interface designed for (unusual) humans, not machines; until recently it was difficult to script. Since version 2.2, there is an interface to generate and set up keys in non-interactive mode. As such I created a bash script called gpg-keygen to generate the following topology for you:
- One master key (
CS) (4096 bit RSA) Ssubkey (4096 bit RSA)Esubkey (4096 bit RSA)Asubkey (4096 bit RSA)
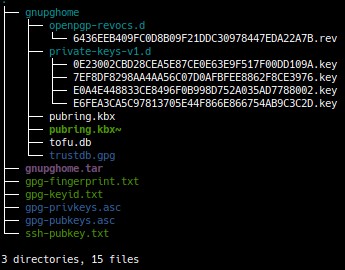
To use it, run the script in an empty directory. The master key has a longer validity and can be used to revoke compromised keys2 as well as create new, certified subkeys. Store it encrypted (with all the other generated files) on a flash drive in a physical safe a with a backup copy in another safe; it’s sensitive.

The remaining 3 keys are for signing, encryption and authentication respectively. They are as big as a Yubikey 5 will allow, and are of the RSA type as the Yubikey 5 does not support elliptic curves.3

Next, you’ll need to copy the contents of gnupghome to ~/.gnupg – on the live session. GnuPG2 should then be able to load and use the keys, though before use the private subkeys need to be moved to the Yubikey.
Now is a good time to change the default OpenPGP user and admin pin from 123456 and 123435678 respectively. Steps:
- Run
gpg2 --card-edit <email> - Enter
admin - Enter
passwd– change PIN and admin PIN as prompted
To move the keys, use gpg --edit-key <email> and enter the following commands:
toggle- For each key (
S,E,A) select one by toggling the asterisk one at a time with the key command (1,2,3 respectively) - When a key is selected, run
keytocardto copy the key to the correct slot on the yuibkey (there are 3, one each for S,E,A) savethen exit. If you don’t save, the private keys will persist locally which defeats the purpose of using the yubikey.
The private keys are now on your yubikey, and no longer exist in ~/.gnupg. The next step is to harvest the public parts of the key to initialise your target machine.
In order to use your new identity on the target machine, you’ll need to import the public keys and give the master key “ultimate trust.” This might sound odd but this means GPG will implicitly trust any sub-key certified by your master key so you can use them.
I prefer a clean-room approach in this case to ensure that not private keys are copied to the target machine; in addition it makes it clear what steps are necessary to set up new machines, too. Bear in mind that if you use the web-of-trust and intend to keep other peoples public keys in GnuPG, you’ll need to transfer them separately.
To make GPG trust your master key ultimately, you’ll need to use the trusted-key setting in ~/.gnupg/gpg.conf. On the live session, you’ll notice a file called gpg-keyid.txt which contains your master key ID4. You can append it to your GPG config like so:
cat <<EOF >> ~/.gnupg/gpg.conf
trusted-key 9D37503A7DA6F9B6
EOF
Of course you should substitute my key ID for yours.
Next, you’ll need to import the public portions of your newly generated keys. These can be found in gpg-pubkeys.asc on the live session in ASCII-guarded format. It was exported by my gpg-keygen script using `gpg2 –export –armor
gpg-pubkeys.asc
. The keys can be piped intogpg2 –quiet –import`.
Finally, it’s important to install a hardened gpg.conf5 to ~/.gnupg/gpg.conf. GnuPG2, by default, will use some relatively weak ciphers presumably for the sake of compatibility.

I’m not aware of a method to generate the private portion on the GPG keys on the yubikey itself when there is a master key involved. ↩︎
If you’re using the GPG web-of-trust. I’m not really, as my web is not really a web. More of a strand. ↩︎
I’ve since learned they do, v5+ https://www.yubico.com/blog/whats-new-in-yubikey-firmware-5-2-3/ ↩︎
Alternatively
gpg --list-secret-keyswould do it after configuration. ↩︎Hardened in 2020. There may be better options now. ↩︎
General Yubikey settings
I recommend disabling OTP mode (unless you like injecting random OTP passwords into chat or the terminal all the time). ykpersonalise can do this, but can become locked out as it relies on OTP mode. To disable OTP mode: ykman mode FIDO+CCID.
It’s important to enable touch-to-everything; this is a fundamental concept – malicious programs are incapable of physically pressing a button.
ykman openpgp set-touch enc on– decrypting passwords will now require a touchykman openpgp set-touch aut on– after this you’ll have to touch the yubikey to use SSHykman openpgp set-touch sig on– signing commits will now require a touch
SSH authentication
There are now actually three ways of using your Yubikey to authenticate to an OpenSSH server:
- Using it as an OpenPGP Smartcard with gnupg2 as an SSH-agent (covered here)
- Using it in PIV mode6
- Using it as a U2F device with OpenSSH 8.2+
In terms of convenience, if you control the server U2F mode might be the best; certainly the least expensive as U2F devices are prolific. Using the PIV mode is a good option of you don’t want to mess with GPG.7
In order to use option (1), after setting up GnuPG as per the previous section you’ll have to:
- Export your
authenticationpublic key in SSH format. You can do this withgpg2 --export-ssh-key <email>and copy it to~/.ssh/authorized_keyson your remote machines as normal. - Configure your environment to use GnuPG2 as an SSH agent (only locally, overriding system agent)
To set up GPG as an ssh agent, I recommend use of the following function in your .bashrc/ or .zshrc. It can even be set as a precmd hook to automatically update the environment – see the section on Tmux below.
| |
This function overrides the system SSH agent and replaces it with a GPG agent – but only if the current session isn’t a remote one in order to make sure agent forwarding is not clobbered. Running any GnuPG2 command will start a daemonised agent if one is not running.
As described in the comments, there’s also a bit of code to automatically recover an hung agent; unfortunately this is necessary to recover from dead sockets that happen time to time.
Note that GPG can ingest regular SSH keys into its own store with ssh-add – assuming you’re running a GPG agent. However, these keys won’t end up on the Yubikey.
There’s also https://github.com/FiloSottile/yubikey-agent to take care of all that! ↩︎
I wouldn’t judge, GnuPG seems esoteric and requires patience to set up reliably. But hey, that’s what this guide is for.. ↩︎
GPG agent forwarding
If you’re developing on a remote machine, you’re probably familiar with forwarding your SSH agent to allow the use of Git with local SSH credentials. GPG is capable of a similar mechanism, allowing commits on a remote machine to be signed using your local Yubikey. GPG uses a unix socket for the agent connection, and a special restricted “extra” socket for remote use. The official guide suggests 2 methods, depending on whether your version of OpenSSH supports unix socket forwarding or not. Both methods are flawed:
- The first method (recommended for OpenSSH older than 6.7) suggests using
netcatto forward the unix socket over a TCP socket. This is insecure, because anyone else on the remote host could connect to the forwarded TCP port and use your forwarded agent. This might be OK if you’re the only use on a given server but it clearly isn’t generally. - OpenSSH 6.7 and above can forward unix sockets, so the next recommendation is to do so natively. However, the location of the local and remote sockets is dependent on the version of GPG, your OS, and your username. As such, a common workaround is to inspect every remote host and add a configuration to the SSH config per host. It also requires server configuration to delete the stale remote socket automatically. Both are manual steps.
Worse, if you use the remote machine locally too (I do for my workshop PC) you’ll find that the stale socket can interfere with any local GPG agent.
A better solution
My solution (after a fair bit of experimentation) was to create an SSH wrapper that probes the remote host to discover the correct location of the socket before killing any remote GPG agent and connecting the intended session. Combined with a pre-command hook that wires up the correct SSH, GPG and X sockets, the result is a seamless experience. See the section on tmux for more information.
| |
$SSH_CONNECTION is set only when the session is remote; in which case the special remote socket is used, else the full local one. This allows chaining of agent forwarding so you can still use your local GPG via a bastion host.
I call my wrapper gssh rather than wrapping the ssh command. Being separate from the normal ssh command, it allow allows you to be mindful about when you forward your mgent – forwarding your GPG agent carries similar risks to forwarding your SSH agent – an administrator on the remote host could use your local GPG agent to further mitigate the risk, enable touch settings on your yubikey as documented below.
Configuration for code signing
To enable code signing with Git + Github:
- Upload the output of
gpg --export --armor <email>(your GPG public keys) to https://github.com/settings/keys. - Tell git which key to use:
git config --global user.signingkey <email> - Tell git to sign always:
git config --global commit.gpgsign true
Password management
I use the standard unix password manager which is compatible with GnuPG2 out of the box. It is powered by git so syncing passwords is easy. I use browserpass to reduce the effort required when used with Firefox. Documentation is well written and usage is straightforward, so I won’t detail the steps here.
My dotfiles copy the passwords over to my PCs when provisioning and synchronising – so long as my yubikey is connected, even new PCs can clone and decrypt my password repository.
One piece of advice: make sure touch to decrypt is enabled, such that passwords cannot be decrypted without your human approval. To do this, see the first section on initialisation.
Seamless tmux integration
When using tmux you’ll find that it’s necessary to re-spawn existing shells in order to use SSH agent / X forwarding when reconnecting. This is irritating, so I’ve written bash and ZSH precmd hooks to take care of updating the environment transparently before every command.
precmd hooks allow the execution of shell commands immediately before each interactive command is run. This gives us the opportunity to modify the environment of the command to be run. Helpfully this means we can make sure the GPG, SSH and X forwarding is set up always, regardless of how old a particular tmux shell is.
Zsh has a precmd hook by default, bash does not – though it’s possible with bash-preexec.
To enable this behaviour, simply set _update_agents (defined above) to be called by the precmd hook after a new function _tmux_update_env:
| |
This new function inspects the environment of the new parent tmux client and relays the appropriate X and SSH variables.
Conclusion
Using GnuPG2 with a Yubikey can be secure and convenient. The set up is rather involved, but scripting it all as part of managing dotfiles means it becomes quick and easy.
Thanks to my dotfiles I’m able to get a new installation running and configured within 30 minutes unattended – packages are installed, followed by system configuration and finally user configuration. As part of user configuration, GPG is set up to use my identity with the private keys on my Yubikey.
Historically I had to set up a new or existing SSH/GPG identity after the provisioning; this was a rather tedious step considering the number of servers and services I have and use; as a compromise the SSH key could be moved on a flash drive, but that’s not ideal. The solution is to automate the association of the private keys on my Yubikey with their respective public keys within my gnupg2 database.
I now have a convenient way of securely accessing secrets upon provisioning a new host. Now, my dotfiles will detect my yubikey and initialise the following:
- My notes, a git repository in
~/notes(I have a script to push/pull to prevent commit fatigue) - My task management database to
~/.dstask(powered by dstask) - My passwords to
~/.password-store(using the standard unix password manager detailed above)
Thanks for reading! If you enjoyed this article or have comments, please consider sharing it on Hacker news, Twitter, Hackaday, Lobste.rs, Reddit and/or LinkedIn.
You can email me with any corrections or feedback.
Tags: